
Intro :
Industrial project workflow to develop a high-tech product
Developing a high-tech product is a long and tedious process, fraught with pitfalls. Without good, rigorous project management, failure is never far off.
At Kickmaker, we manage high-tech product development projects by integrating industrialization constraints as early as possible, i.e. right from the end of the feasibility study, and by bringing agility and transparency to a field that is still very obscure.
In this article on the management of an industrial project, we cover the analysis and expression of needs, the feasibility study, the design and definition phase, industrialization, validation and homologation, and finally mass production.
The purpose of this article is not to provide an exhaustive list of all the stages involved in managing an industrial project, but to give you an overview of the entire process. A special focus on industrialization will soon be included in a series of dedicated articles.
Enjoy your reading.
The different phases :
Phase 1 : Analysis/expression of needs.
Phase 2 :Feasibility study : reflection on the design, on the idea.
Phase 3 : Design and definition phase electronics, mechanics, software… Design of a functional prototype that meets the specifications & validates the specifications and expression of needs. At Kickmaker, we take into account industrialization constraints.
Phase 4 : Industrialization. Critical phase. NPI line.
Phase 5 : Validation / homologation.
Phase 6 : Mass production
These different phases can also be assessed according to Kickmaker’s support packages :
1/ Analysis and expression of needs.
Analyzing needs is a fundamental requirement for product creation or conversion. The purpose of this step is to clearly define the aim, objectives and limits of the study:
- Identify the need
- Express the need
- Validate the need
A prerequisite for launching a project is the preparation of a MRD (Market Requirement Document).
Market Requirement Document
This document is a functional marketing analysis that portrays end-users, describes product uses, the target market… This is the highest level of marketing analysis. It is itself the prerequisite for the PRD (Product Requirement Document).
Product Requirement Document
After the MRD, you’ll need to prepare a PRD (Product Requirement Document). The purpose of a PRD is to provide the level of detail necessary for the development team to understand the product capabilities, functionality and features required to meet the market needs identified in the MRD.
In other words, a strong PRD defines the scope and reach of the product’s capabilities sufficiently for the development team to understand what to build, and how to build it. These are the project’s technical specifications. It’s a good idea for the project management team to produce this PRD.
PRD, MOA & MOE
Today, in traditional service provision, the project owner (MOA) defines the need, and the project manager (MOE) carries out the design work, and delivers to the customer. With the aim of integrating greater agility into hardware project management, it is preferable for the project owner (MOA) and the project manager (MOE) to be carried out by the same person or the same entity, and for the project manager (MOE) to retain the role of project owner assistance (AMOA) to discuss and deepen the identification of the need. In short, we need to break down the separation between AMOA and AMOE, thus avoiding problems of handover and understanding between the various players involved.
A fixed but evolving PRD
The PRD is a deliverable of the feasibility phase, which is intended to be fixed, but modifications can be made to it throughout product development, thanks to ECRs (engineering change requests).
An ECR is an engineering change request. In project management, ECRs need to be formalized, as they lead to changes in scope, and therefore in workload and contract. An ECR can be requested by the customer or the service provider, but must be agreed by both parties. An ECR can also be linked to project risk management.
The PRD will therefore be versioned during the different phases
To produce the PRD, it is necessary to question all the players involved in the project: technical, production, methods, marketing, etc. In order to have as global a vision of the project as possible, to formalize the product’s functionalities from the outset, to anticipate development costs and to monitor the project’s progress.
Choose a different EMS from your design office
It’s also crucial that the person in charge of operations (EMS, ODM…) is different from the MOE, to avoid the case of one of our Kickmaker customers who found himself stuck with his supplier/engineering office. Thinking it would be easier, our customer chose an engineering office integrated into their EMS. The problem: logically, no design transfer has been made, and our customer has no access to his production file, nor to the source files produced by the design office. The result? They’re tied hand and foot to this office and this EMS, with no way of leaving.
Involve your partners early in the project
Finally, don’t forget to involve the operations manager in the process at an early stage, to ensure qualified industrialization. It’s good to industrialize, but it’s better to industrialize for the end partner. So you need to identify two or three EMSs you want to work with, and get them involved early on.
This phase comprises several stages:
Needs analysis :
– Identify the need: market study, audit
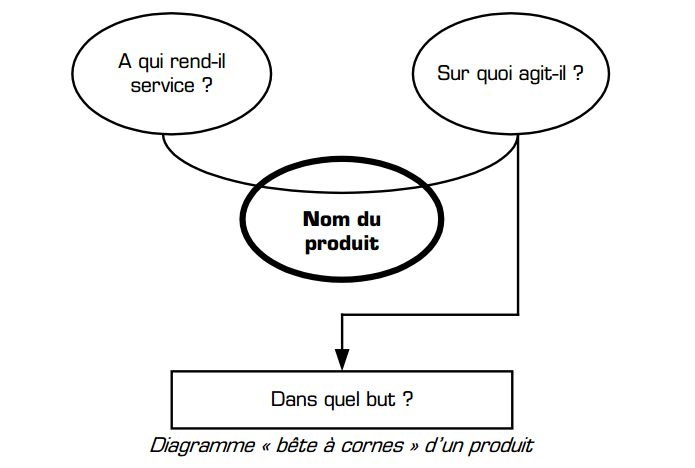
– Stating the need: APTE, horned beasts
– Validating the need: stability of the need
Functional expression of need :
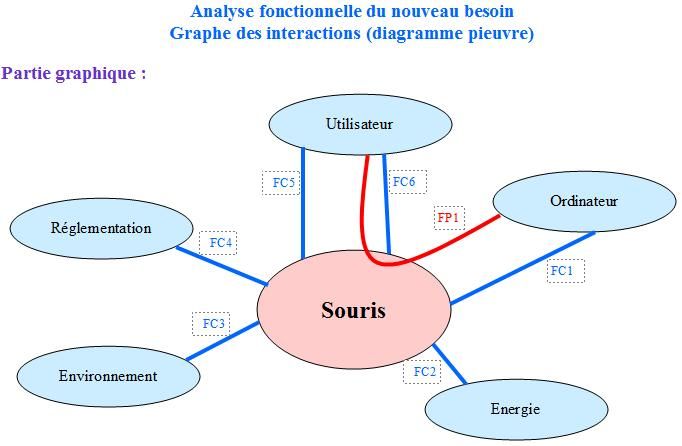
– Research and order -> environment, octopus, service functions
– Characterize: criteria
– Prioritize/value: cross-tabulation
Production of PRD :
– Problem presentation: market/context, horned beasts
– Functional statement: service functions
– Response framework: proposals, call for variants
We need to think in terms of “function” to define (or redefine) a PRD that enables us to identify, characterize, order, prioritize and add value to a product’s functions.
Deliverable: PRD
2/ Feasibility study.
The purpose of this stage is to try to meet the expressed need by exploring the various possible development paths. It is then possible to refine the need, and reveal the functions provided by the product, enabling the expressed need to be satisfied.
The purpose of the feasibility study is to :
- Measure the objectives to be reached, the design budget, the cost price, the expected quality, etc.
- Evaluate the conditions necessary for the project’s success (timing, equipment, skills, financing, etc.),
- Study the various possible scenarios,
- Plan the production launch.
This means asking whether the project will be profitable, whether it is technically feasible, and whether the company has the human, financial and technical resources to implement it. This feasibility study also enables us to raise capital to finance the project’s implementation.
At Kickmaker, we take the time with our customers to do a product mapping, to fully understand and list all the product’s service functions (horn beast, product and diagram of main functions and constraints – also known as octopus).
We then go on to help them characterize these functions in precise, quantifiable terms. Examples: Function: Aesthetics/ Criteria: Black/ Level: RAL 7021/ Tol and Flexibility: RAL 7024 accepted/ and prioritization: MUST Have? Nice Have?
Note: a CDC/ Spec/ or PRD … is never completely fixed, and may evolve during the course of the project for various reasons.
Deliverable: versioned PRD
3/ Design & define
This stage is the final stage of product definition, before industrialization.
During this stage, you’ll need to design a functional prototype: an original model that presents the main technical and functional characteristics of the future final product. You’ll also need to define the exact solution chosen and the components to be manufactured, leading to the drafting of the definition file.
At Kickmaker, at this stage we have already integrated the constraints of industrialization.
Deliverable: versioned PRD + functional prototype
4/ Industrialize
During the industrialization phase, you will have to design an industrial prototype and set up the production tool for the final product (ranges, times, tooling, supplies, controls…).
There are several stages in the industrialization phase
1/Industrial prototype
The first step in industrialization is to design an industrial prototype that meets the constraints of industrialization. To find out how to make a good industrial prototype, read our article on the subject.
The design of this prototype comes with a PRD (or functional specification) produced during the previous stages, defining the product’s various functions, dimensions, performance, packaging, etc., as well as a 3D plan and the POC used to raise funds. Whereas the POC is used to prove the product’s function, the industrial prototype is used to project the product’s industrialization.
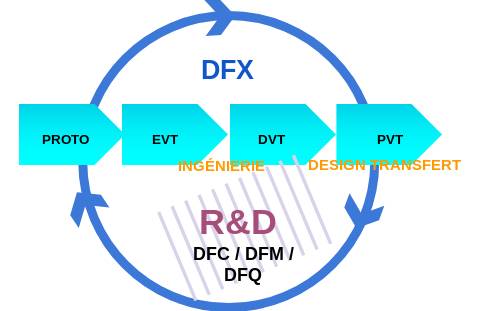
This industrial prototype stage is preliminary to the EVT DVT PVT stages.
2/ EVT (engineering validation test)
We start the first prototypes with “workshop” definition EVTs (e.g. with a 3D printer, etc.).
The purpose of the EVT phase is to check that the prototype works with all the functionalities defined in the specifications or PRD, and that the object’s objective has been met (e.g. a vacuum cleaner that really sucks). The EVT is designed to make sure that we haven’t got the function wrong, and that there are no false notes. It validates functionality.
Deliverable: EVT prototype
3/ Freeze design
Next comes the design freeze stage. At this stage, you’re confident in your design, and you know it’s robust since you’ve already tested it in EVT. To move on to the design freeze phase, you need to have a finished 3D, a 2D plan, a definition of materials and a test plan (a document summarizing all the tests to be carried out once the specifications have been drawn up). At this stage, the product design is frozen.
4/ DVT (design validation test)
During the DVT, we test the design with real parts, with dimensions and materials that are close to what we want. Then we go to suppliers to start producing parts. At first, we may choose parts or materials that will enable us to produce the product in small numbers (e.g. injected parts, but with a silicone mold that will take about fifty injections, but will enable us to carry out validation tests).
We start the DVT phase when we’re sure the design will work. In this way, we can test and validate the design, and since it rarely works the first time, we repeat the test loops until we arrive at a satisfactory product.
Once all the parts have been assembled, they are assembled and tested.
At the end of the DVT, you should have a document validating all the tests, as well as the frozen and squared 3Ds. We can then move on to the PVT (production validation test) phase.
5/ The Tool Go
The Tool Go represents the definition of the number of parts to be ordered, the logistical conditions, the supply lead times, the price…
In parallel with product development, suppliers work to produce the necessary parts. This is when you go to the assembler to give assembly instructions.
As product designer, we also design an assembly range: we produce BOMs (Bills Of Materials), parts presentations and assembly instructions.
The parts are then sent to the assembler, who will have prepared the assembly line: number of assembly stations, order, method…
The assembler will produce a certain number of parts, all of which will be made in one day, to simulate a day’s assembly. Once this stage has been completed, the PVT can begin.
6/ PVT (production validation test).
During the PVT phase, we no longer touch the design, but validate the assembly process. During the DVT phase, the parts are similar to those that will be used for series production, but assembled by hand. During the PVT, assembly is simulated on the assembly line as it would be during series production, so that the assembly process can be tested. It is during this stage that the pre-series is set up to test the part design and assembly process.
Once all these stages have been validated, product industrialization is complete. Validation and production can now begin.
5/ Validate – Certify
Throughout product development, the conformity of the product with the request is verified. This step validates the product once and for all, before it goes into production.
6/ Production
This stage consists of producing the products while gathering and exploiting qualitative production data to control quality, costs, quantity and delivery times.
In Brief,
Good project management is essential to the successful development of a high-tech product.
And don’t forget that it takes a lot of money to finance the creation of a high-tech product. This money will finance
- Production of the model,
- Prototype production,
- Pre-production launch,
- The launch of the series,
- Legal and contractual aspects,
- Marketing and product communication…
Here are a few key factors for the success of an industrial project:
- Identify the need, carry out MRD & PRD,
- Define the development plan: pace the project by dividing it into phases,
- Involve resources in the project and get them to work together: get people from different backgrounds and multi-disciplinary professions to cooperate harmoniously,
- Integrate industrialization constraints at an early stage,
- Manage risks,
- Work closely with customers, involving them in every stage of the project and in decision-making,
- Know how to compromise,
- Always weigh up your choices against your objectives (industrial AND economic realities) and know how to postpone modifications to future versions (otherwise a project will never be finished).
We wish you every success!