Industrialization loves acronyms, and acronyms love it back. MP, FA, EPM, ODM, OPM, PRD, DRP, BOM, DFX, DFM [ETC] Among these acronymic specimens, some designate processes, others documents… But all deal with industrialization. While each professional sector uses its own jargon, the industrial sector is a great fan of acronyms.
The ones we’ll be dealing with today take the form of EVT/DVT/PVT.
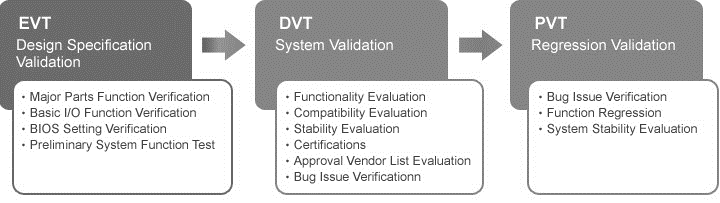
The acronyms EVT DVT PVT stand for Engineering Validation Test / Design Validation Test / Production Validation Test respectively. Today, we’d like to share with you our vision of EVT/DVT/PVT, built up over many years of expertise and product industrialization.
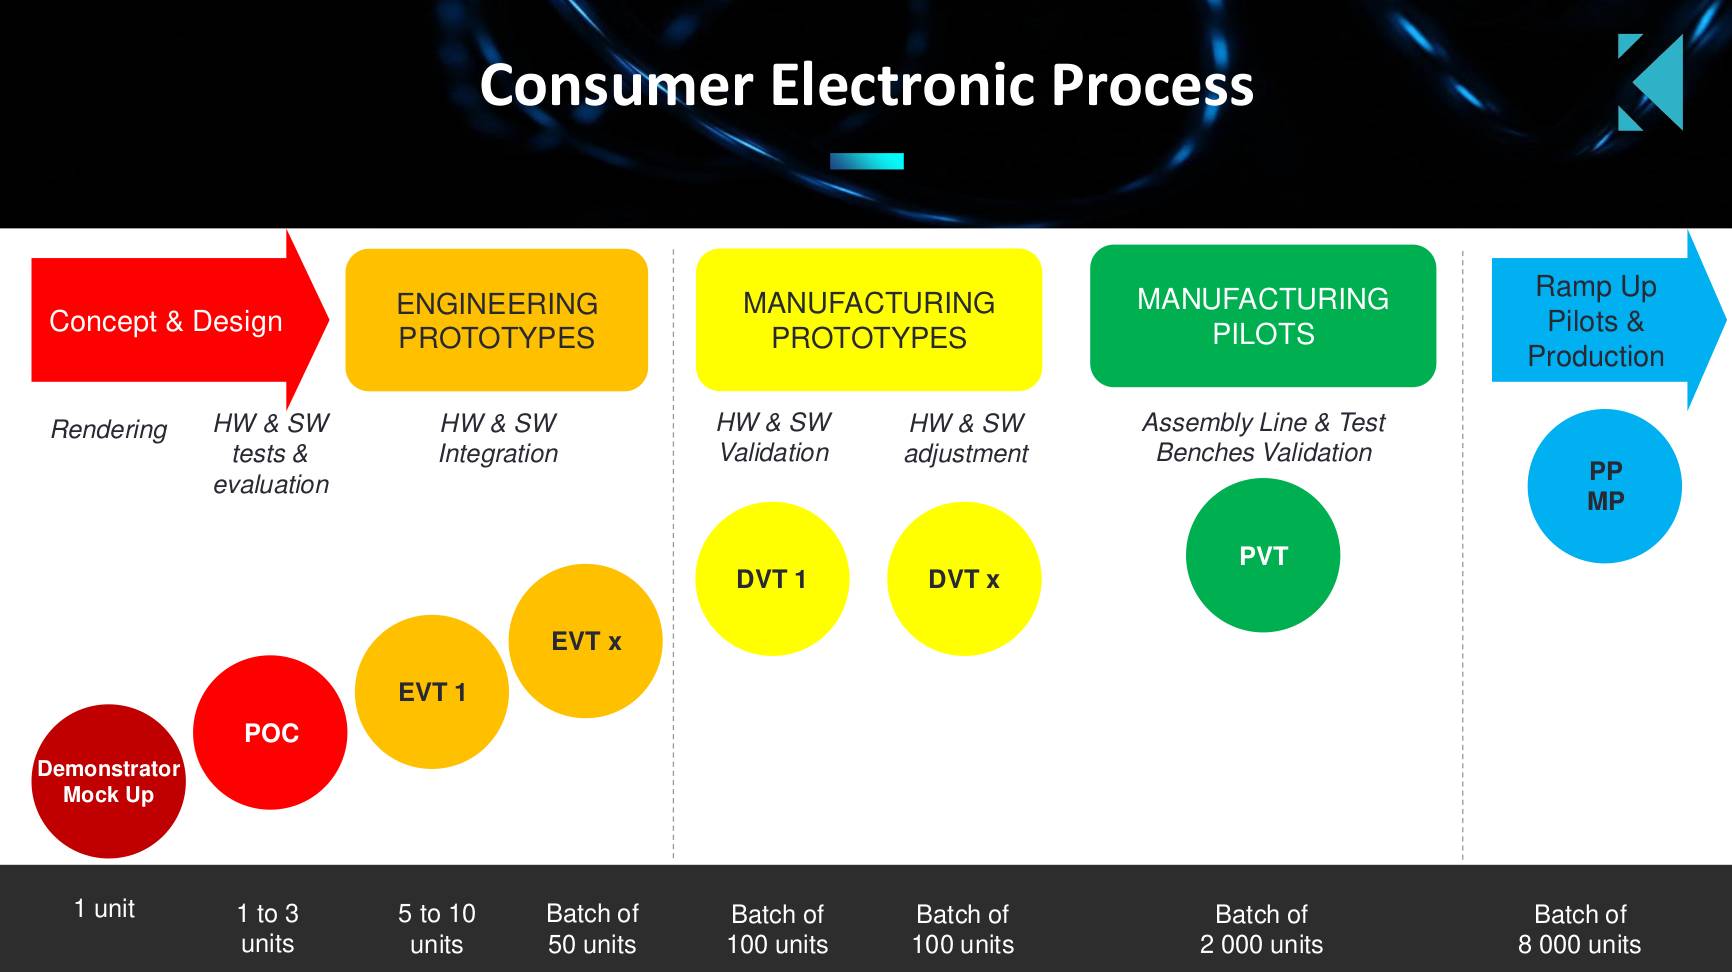
These three acronyms refer to the different stages of industrialization, between POC and mass production: from the least mature to the most mature. These different stages exist to minimize the risk of errors during mass production. Defects in the design and process are discovered during these stages, and it is very important to detect them early before embarking on mass production.
They also help structure the decision-making process. The starting point is a large number of options, which are then narrowed down to a fixed number of options, so that all that remains to be done is to correct/adjust/optimize.
In EVT we validate a functional scope, in DVT we stabilize and in PVT we adapt production. From the DVT phase onwards, we no longer touch the scope, but correct errors, adjust elements and optimize performance.
We progress in stages. Each stage brings an additional degree of maturity, and each iteration produces new prototypes. If the result of a stage is not satisfying, we iterate, keeping in mind the time/cost/quality trade-off. Each iteration has a cost and implies additional delays.
Each of these phases is cyclical and includes sub-phases of 1) design 2) prototype 3) validation. These sub-phases are usually no more than three in number. So you’ll have EVT 1 EVT 2 EVT 3. The principle is the same for DVT, with the difference that the sub-phases will be carried out on a final product scope, using tools that will become final as DVT progresses.
For the PVT, this involves :
1- installation of the production line
2- line review
3- production test
4- FAI (first article inspection) + reports
Then identification of weak points => return to 1 for continuous improvement.
At the end of PVT, we validate the golden sample plus all the production resources to move on to MP (mass-production), which will also be subject to a continuous improvement process.
Upstream of EVT/DVT/PVT is the prototyping phase, which leads to a proof of concept. There are “looks like” prototypes, which validate design, exterior appearance and usage; and “works like” proofs of concept, which prove product functions.
If you’d like to find out more about what makes a good industrial prototype, take a look at our article on how an industrial project runs smoothly.
This article was produced with the precious help of Stépane Tampigny and Alexis Foiret, Kickmaker engineers.
EVT : Engineering Validation Test
Definition :
Once the hardware has been finalized, it needs to be tested and validated. This stage is called EVT.
The purpose of the EVT phase is to check that the prototype works with all the functionalities defined in the PRD, and that the object’s purpose is fulfilled (e.g. to make a vacuum cleaner that actually vacuums). The EVT phase therefore ensures that the project does not get the function wrong. DFX have already been integrated into the process.
Targets :
In pre-EVT: test everything you want to put into the product (often in independent pre-studies).
In EVT: identify the problems that need to be solved before design, produce prototypes offering the key functionalities, with existing components or still in the development stage, in the desired size. Integrate what was POC before to arrive at the end of EVT at a feasible scope.
Quantity :
Between 1 and 5 per prototyping cycle. To validate the EVT, dozens of prototypes will be needed for an average product.
Resources :
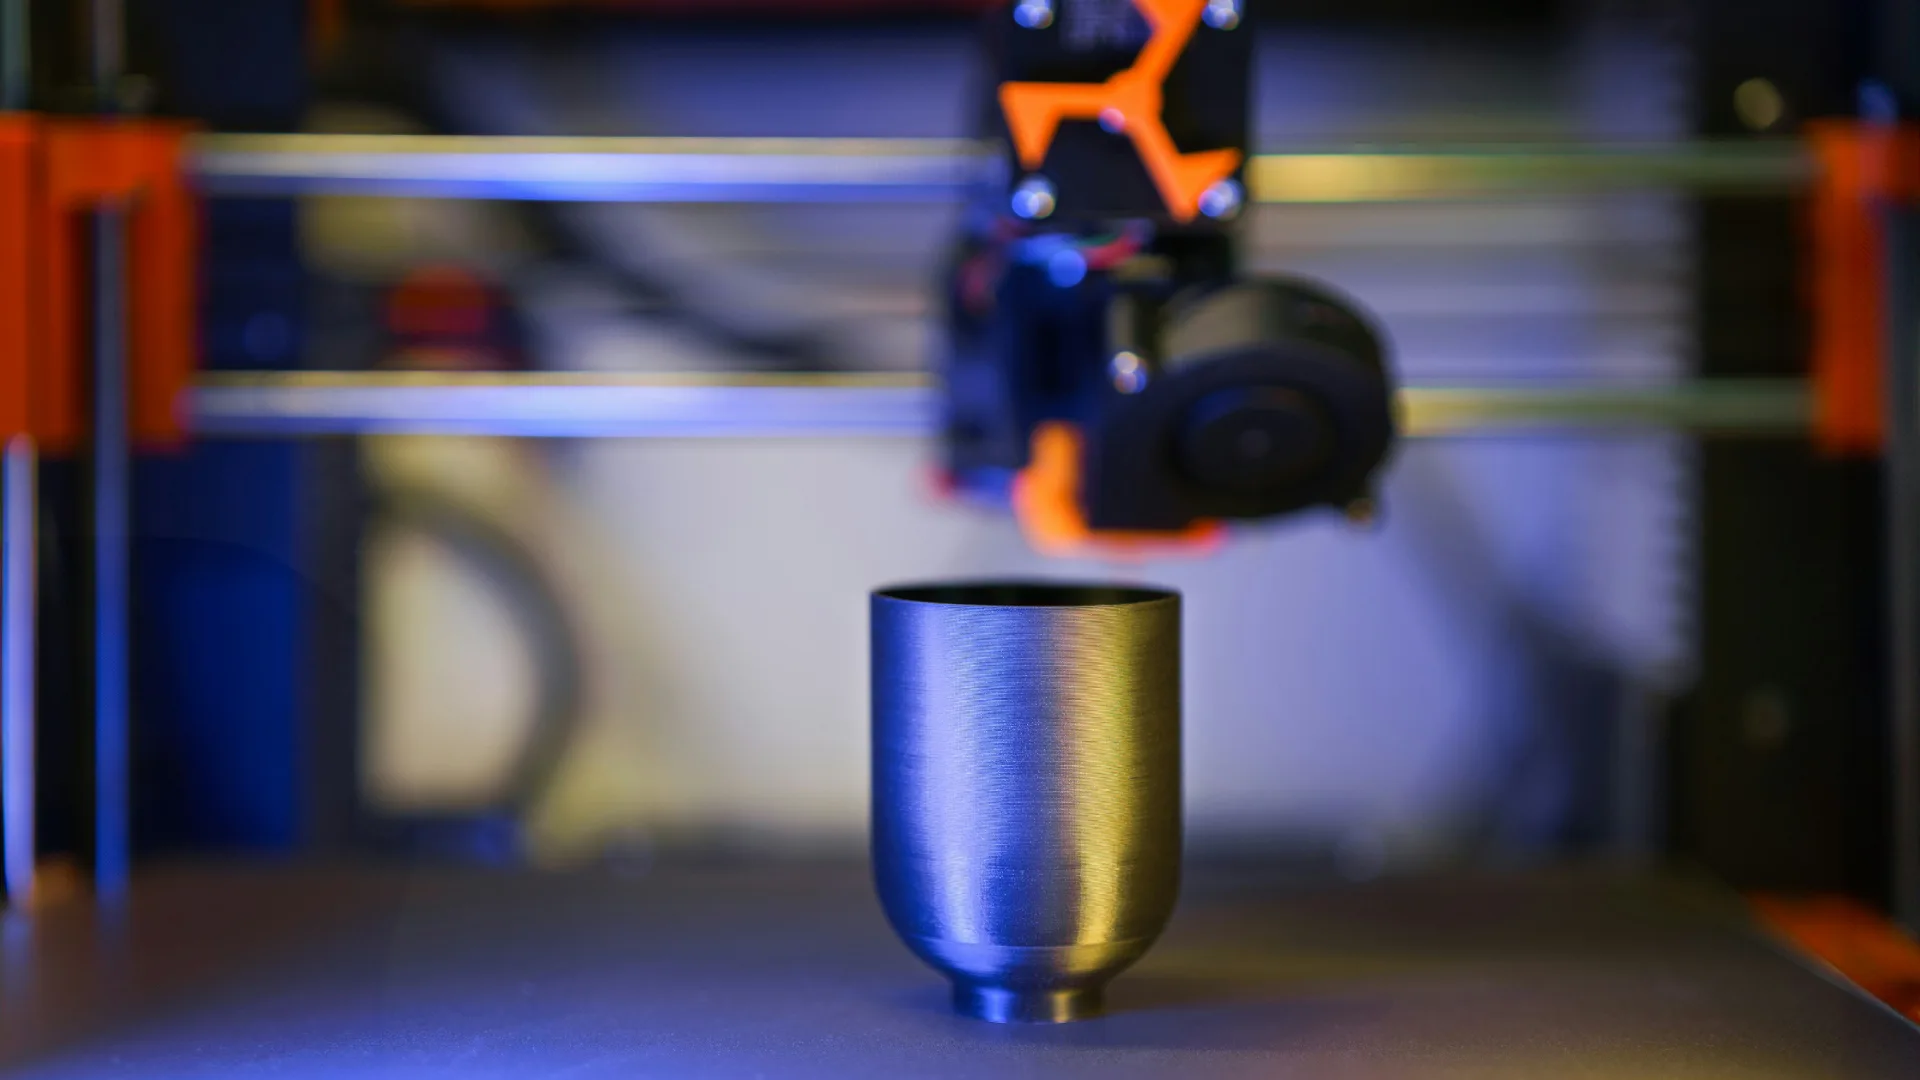
Rapid prototyping, 3D printing, laser cutting, custom-designed electronic boards, custom-designed mechanics, etc.
Results :
Prototype in the desired size, key functionalities present on the product. Selected components and technologies can achieve the desired cost.
Deliverable :
Prototype containing the desired functions.
Limits :
In general, prototypes are in their raw cosmetic state: no surface finish, no color… But it all depends on the importance of cosmetics in your product. If design or size are major functionalities, then your prototypes and mockups should already show the final design, so that you can design the electronics and mechanics in relation to the final design.
In general: no optimizations (cost, technology…) and some secondary functionalities may be missing.
DVT : Design Validation Test
Definition :
The DVT phase is initiated when the EVT has been validated and the design is certain to be functional. DVT is used to carry out the validations requested by the customer on a fixed design. It’s rare for the design to be right the first time, so we iterate on the design until the product is perfect.
During the DVT, we test the design using real parts with dimensions and materials that are close to what we want to achieve. At the same time, we contact suppliers to begin production of the various final parts.
In the middle/end of the phase, we even test the injected parts. We use the final molds, which are adjusted as we go along (minor corrections, surface treatment, parameter adjustments, debugging and denoising for electronics, etc.). At the end of this phase, the product must have the final specifications validated. Ideally, the PVT phase is only used to validate the production resources (assembly line, jigs and test bench, etc.).
During this DVT phase, it is possible to make deliberately temporary choices of parts or materials that will enable production in small numbers (e.g. injected parts but with a silicone mold that will only last twenty or so injections, but will enable validation tests to be carried out). Note that silicone duplication rarely exceeds 20 part runs. In fact, with this technology, the PU used is a bi-component Isocyanate and polyol. Once these 2 components have been mixed, the material becomes exothermic after casting, vacuum bagging and pot life. This means it attacks the surface of the silicone as the prints are made. Having to remove the parts from the molds by twisting and deforming them (like silicone cake molds), also damages the properties of the silicone mold. At this stage, it’s best to use all the final components. Unless you decide to market the product as is, i.e. with PU parts, or 3D printing for economic or marketing reasons. This can be done.
The product must be designed in small quantities and subjected to various stresses in order to test resistance, tightness, safety… A large battery of tests will be necessary to determine whether the product is ready for production or not. Like the EVT, DFX are worked on during this stage.
DVT products are used for all laboratory validations (Aging, thermal and climatic cycles, vibration, packaging, dropping, chemical resistance, biocomp…). Certification issues are also integrated at this stage. During the DVT phase, products should only use parts from medium production runs. And not Dupli Silicone parts.
Target :
Produce fully-functional prototypes, with components intended for series production, that can be used for certification (CE), and identify potential problems that need to be resolved before design.
Realize/industrialize and reject what in the end is not feasible or too costly (quality vs. functions vs. price vs. sales target) to arrive at a final product at the end of the phase.
Quantity :
Generally between 20 and 100, depending on the volume of MP (mass production) and the cost of a prototype. Certification requires a certain number of samples, and validation alone consumes at least 20 to 30 prototypes. Not counting those needed for marketing.
Resources :
Rapid prototyping, custom components; custom mechanics, industrial equipment.
Deliverable :
Validation document for all tests, 3D frozen and squared.
Result :
Functional prototypes, ready for mass production, with no major defects. Some prototypes can be distributed to beta testers or shown to future customers. DVTs can be used for certification testing.
Limits :
Mechanical parts are not final, and their cosmetic appearance may be imperfect.
PVT : Production Validation Test
Definition :
The PVT phase is the last stage of industrialization, the final step before mass production, allowing the first products to be sent out to customers, often backers of crowdfunding platforms. During the PVT phase, the design is fixed and the assembly process is validated. Parts are close to series production, but assembled by hand. Line assembly is simulated to test the assembly process.
It is at this stage that the assembler executes the planned production line(s), using all the final equipment, processes and quality assurance steps.
During the PVT phase, DFX are corrected, test benches and production molds are designed, and ideally minor mechanical adjustments are made. It is very common at this stage to find assembly problems, and this may include design changes to plastics and PCBAs to minimize yield waste, optimize assembly if the cost impact is significant, or optimize certain parts if the FMECA highlights weaknesses…. All components and processes must be at the planned stage of series production, including packaging, logistics, freight forwarding and quality assurance checks.
The production line has to be optimized for the product, reducing the time between each step if possible, and making the whole process as smooth and reliable as possible.
Quantity :
Between 50 and 200.
Targets :
Verify mass production yields at mass production speeds. Prove that the factory production and testing process is operational -> take a finished product and build a production line optimized for mass production.
Resources :
Electronics and final components. Mechanical parts from production molds.
Result :
Validation that end-of-line products conform to design.
Deliverable :
Final product in limited quantities.
Limits :
The time required for production may still be high. Not all procedures have yet been written.
All these major steps have been simplified to make this article easy to digest. Whatever happens, making a product is a great adventure and a long journey. Having an overview of the various stages, even a quick one, can help you avoid problems.
Glossary
DFX : Design for X
Design the set of processes used to optimize product design
- “DFA Design for Assembly: design of products to facilitate assembly
- DFM Design For Manufacturing or Design For Manufacturability: design of products to promote manufacture
- DFMA 1/ Design for Manufacturing (or Manufacturability) and Assembly 2/ Design for Maintenance: design products to promote maintenance
- DFP Design For Producibility: product design for producibility.
- DFP Design For Procurement: selection of components or supply chain schemes to facilitate series production (supplier reliability, lead time optimization).
- DFR Design for Reliability: product design to promote reliability
- DFS Design for Services: product design favoring services”.
POC : Feasibility demonstration. Prototype designed to demonstrate the feasibility of a project. It takes place well upstream of the product development phase, before the functional prototype.
PRD : “The purpose of a PRD is to provide the level of detail necessary for the development team to understand the product’s capabilities, functionality and features, necessary to meet the market needs identified in the MRD.”
Find out more in our article: how an industrial project works.